How to Stream on Twitch Like a Pro: A Step-by-Step Guide
Learn how to stream on Twitch by following our step-by-step guide. From setting up OBS to growing your audience. Start streaming on Twitch today!
Twitch has become a popular streaming platform for gamers and other creators to share their content with the world. Whether you want to join the community or you are already an active user looking to start streaming, this guide will provide you with a step-by-step process for getting started with Twitch streaming.
To begin streaming on Twitch in 2026, you’ll need to set up a few things first. A stable internet connection, a computer or gaming console, and streaming software are essentials for your journey.
As you follow the steps and configure your equipment, remember to stay engaged with your audience and have fun. The more you enjoy your streaming experience, the more your viewers will be drawn to your channel.
Setting Up Your Twitch Account
Creating a Twitch account is the first step toward streaming on the platform. To set up an account, navigate to Twitch (opens in a new tab) and click the Sign Up button in the top-right corner of the page. Fill out the form with your desired username, password, email (or phone number), and date of birth.
Two-Factor Authentication
To keep your account secure, it is vital to enable Two-Factor Authentication (2FA). This additional security layer requires a unique code sent to your mobile device, in addition to your password, when logging in from a new device or location. To set up 2FA, follow these steps:
- Log in to your Twitch account (opens in a new tab) and click on your profile picture in the top-right corner of the page.
- From the dropdown menu, select
Settings. - Go to the
Security & Privacytab. - Under
Two-Factor Authentication, clickEnable Two-Factor Authentication. - Enter your phone number and confirm the unique code sent to your mobile device.
For added security, it is recommended to use an authenticator app, such as Google Authenticator (opens in a new tab) or Authy (opens in a new tab), for your 2FA method. To enable this on Twitch, simply scan the provided QR code using your preferred app and enter the generated verification code.
What Hardware do you need to Stream on Twitch?
Computer and Internet Connection
There are a few different hardware setups you can use to stream on Twitch. You can stream from a computer, which is the most common and customizable option. Alternatively, you can stream from a console if you’re a gamer who wants a simple stream directly from your PlayStation or Xbox. For those who want to take your streaming outdoors, streaming from a smartphone is a great, flexible option.
In this guide, we will focus on streaming on Twitch from a computer, whether a PC, Mac, or Linux computer.
One of the main issues that Twitch streamers face is broadcasting a video game. This is because your computer needs to both run the video game at a high framerate and encode the live video to send to Twitch. If that’s the kind of content you want to livestream, I’d highly recommend investing in a decent PC with a powerful CPU and GPU. Check out our detailed guides on streaming builds for different budgets.
To stream without interruptions, it’s essential to have a stable internet connection in addition to a good computer. For 1080p streaming at 60 FPS, a minimum upload speed of 6 Mbps is recommended, but it’s best to have some extra headroom. Using a wired connection instead of Wi-Fi is also recommended to prevent dropped frames and ensure a more stable experience.
Microphones and Cameras
High-quality audio makes a huge difference in your stream’s overall experience. Invest in a good microphone, such as a USB or XLR microphone, for clear audio. The Elgato Wave:3 (opens in a new tab) is a popular choice, or if you’re on a tight budget the Razer Seiren Mini (opens in a new tab) microphone is excellent for its price. For higher-quality audio, consider an XLR microphone with an audio interface.
If you want to show your face during streams, a webcam is necessary for video. Many options are available at different price points, but two great options are the Logitech StreamCam (opens in a new tab) and the Elgato Facecam (opens in a new tab).
Capture Cards and Game Consoles
If you plan to stream using a gaming console like a PlayStation or Xbox but still want all the benefits of streaming from a computer, you will need a capture card. A capture card takes the video output from your console and sends it to your computer for streaming. Popular capture cards include the Elgato Game Capture HD60 S+ (opens in a new tab) and the AVerMedia Live Gamer Portable 2 Plus (opens in a new tab).
Choosing the Right Streaming Software
As streaming software options continue to expand, selecting the best one for your content is more important than ever. In this section, we will discuss three popular options: OBS Studio, Streamlabs Desktop, and Twitch Studio.
OBS Studio
OBS Studio (opens in a new tab) (Open Broadcaster Software) is a free and open-source software designed for video recording and livestreaming. It’s available on Windows, macOS, and Linux, making it accessible to a wide range of users. OBS is highly customizable and powerful, allowing you to adjust settings to match your specific requirements. Additionally, users have access to plugins and themes to further enhance their streaming experience.
Streamlabs Desktop
Streamlabs Desktop (opens in a new tab) (previously called Streamlabs OBS) is another popular broadcasting software. It is based on OBS and carries over many of the same features. The main differences are Streamlabs Desktop has a more beginner-friendly interface and a variety of integrated tools to enhance viewer engagement, such as a built-in chat, donation tracking, and customized alerts.
Twitch Studio
Twitch Studio (opens in a new tab) is Twitch’s first-party streaming software, available on Windows and Mac. It is designed with a focus on simplicity, making it easy for new streamers to set up and go live within minutes. Twitch Studio provides a guided onboarding process and basic customization options, such as custom overlays, webcam settings, and audio controls.
To determine the best broadcasting software for your Twitch channel, consider your streaming needs and personal preferences. Each option has its own set of unique features and benefits, so choose the one that aligns best with your requirements and streaming goals.
For the rest of this guide, we’ll be covering how to set up OBS Studio. OBS Studio is the most performant, customizable, and widely used streaming software. Plus, it’s free and open-source.
Setting Up OBS Studio
Downloading and Launching OBS Studio
To begin streaming on Twitch, you’ll first need to download and launch OBS Studio (opens in a new tab). Once the installation is complete, open the application to start setting it up.
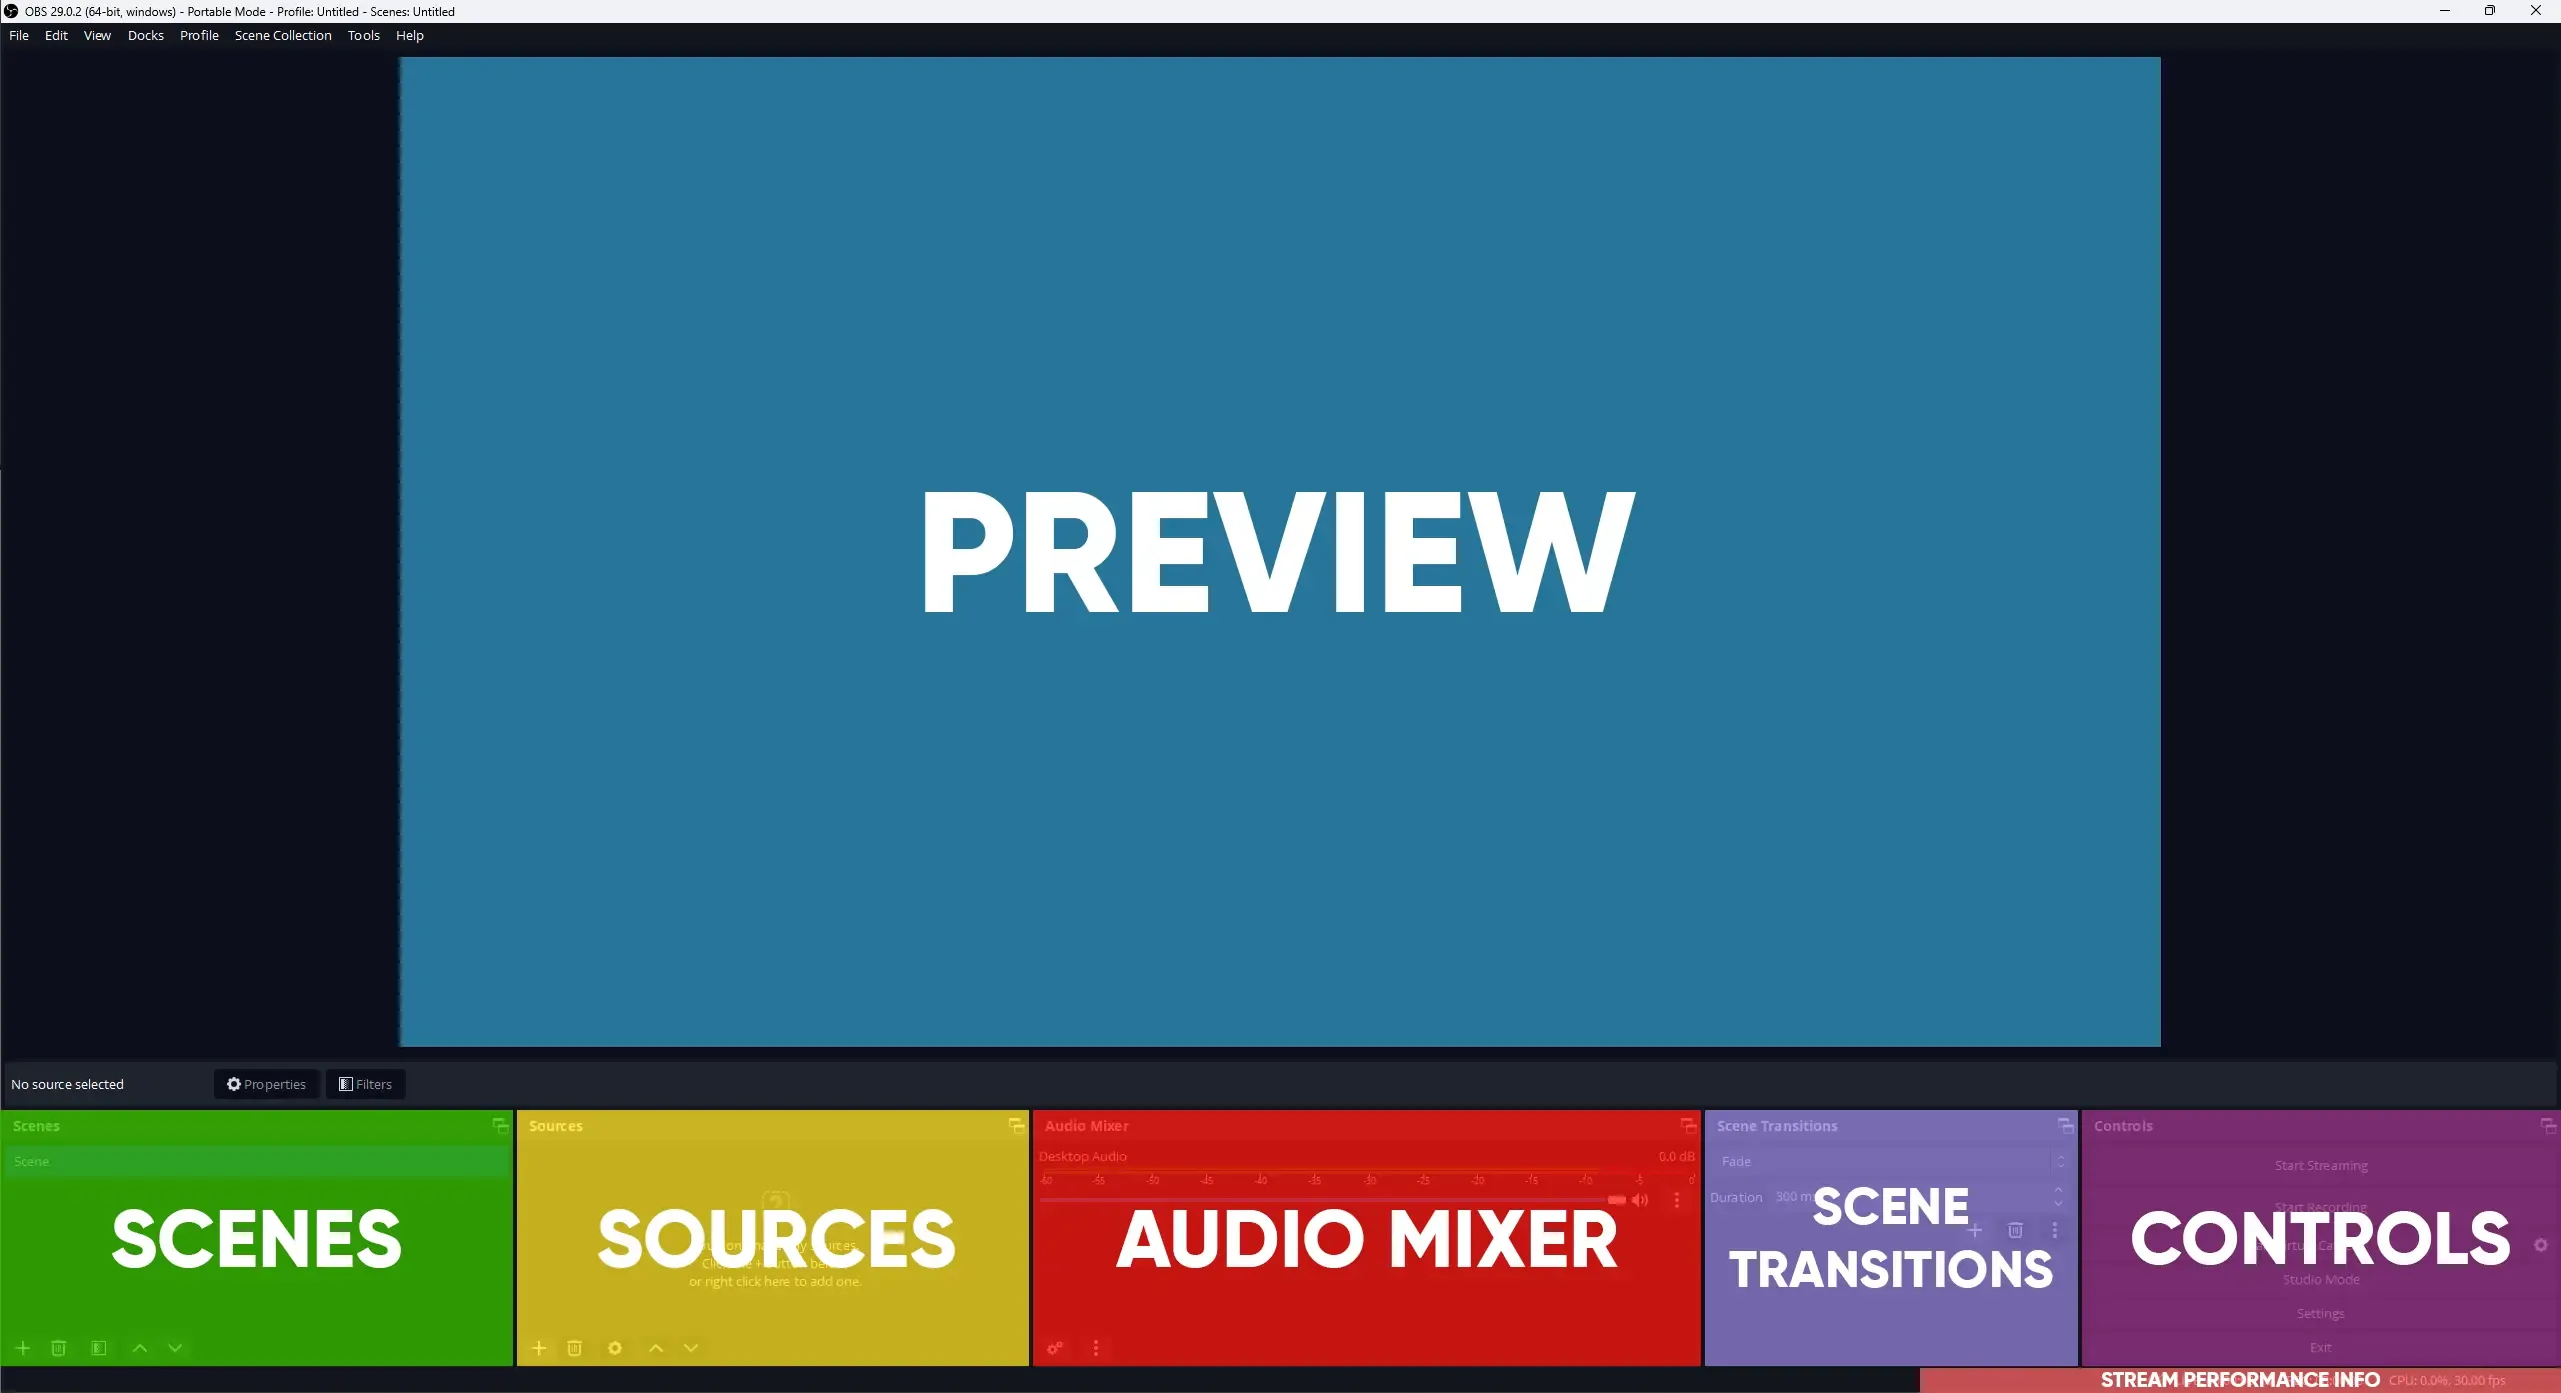
OBS Studio Layout
OBS Studio features several key elements in its layout:
Preview: Displays a live preview of your current scene. This is what your viewers see.Scenes: Allows you to manage all the different scenes for your stream, each consisting of a collection of sources.Sources: The individual building blocks of your stream, these include game captures, webcam feeds, overlays, and alerts.Audio Mixer: Controls your audio levels, such as your microphone, music, Discord chat, and game sounds.Scene Transitions: Selection of smooth transitions to use between scenes during broadcasts.Controls: Provides options to start/stop streaming, recording, and access settings.Stream Performance Info: Displays real-time stats, such as bitrate, framerate, and dropped frames.
OBS Studio Settings and Auto-Configuration Wizard
Access the OBS Studio settings by clicking the Settings button in the lower right corner. From here, you can configure your stream settings, such as video resolution, bitrate, framerate, and choice of encoder.
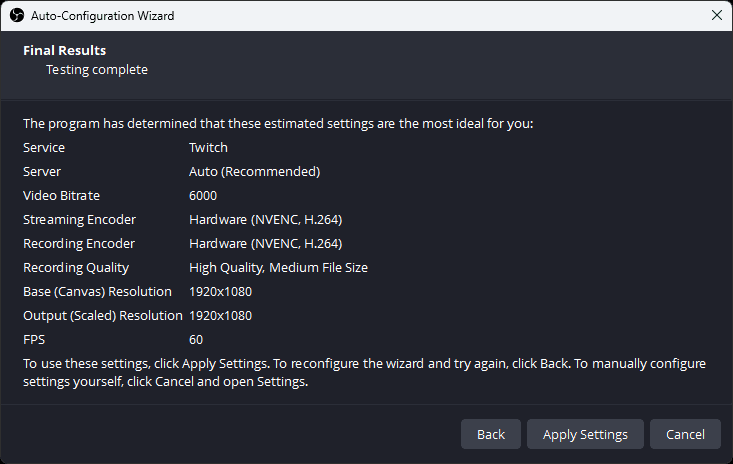
To simplify the setup process, you can also use the Auto-Configuration Wizard found under Tools in the top menu. This will assist you in optimizing your settings for your specific hardware and internet connection.
Go through the Auto-Configuration Wizard and select the appropriate options:
- For
Base (Canvas) Resolution, choose your main monitor’s resolution. Note that this is not necessarily the resolution you wish to stream at as OBS can scale the output resolution. - Set
FPStoEither 60 or 30, but prefer 60 when possible. - Under Stream Information, select
Twitch(or another service) from the drop-down and connect your account by logging in with your Twitch credentials. You can also connect by pasting in your stream key, but this won’t give you windows in OBS for your Twitch Chat and Activity Feed. - Leave
Prefer hardware encodingchecked. This allows OBS to use any GPU-based encoders such as NVIDIA’s NVENC. - Leave
Estimate bitrate with bandwidth testchecked. OBS will then run a short test on the Twitch servers to see what bitrate your internet connection can maintain. - After the test has finished, you’ll get an estimated configuration of ideal settings. Click
Apply Settingsto save them.
Bitrate, Resolution, Framerate, Encoder (x264 vs NVENC)
Remember that the estimated configuration provided by OBS Studio is not set in stone. You’ll likely need to adjust settings in the Settings menu at some point. Here’s a quick summary of the most important settings that you may want to change:
BitrateThe amount of data your stream sends per second, higher bitrate equals better quality (but requires more bandwidth to view). Twitch’s recommended bitrate is 4500-6000 Kbps for 1080p streaming.Output ResolutionThe dimensions of your video output. Typically set to 1920×1080 (1080p) or 1280×720 (720p) for better performance on low-end systems.Framerate (FPS)The number of frames displayed per second. Common values are 30 or 60 FPS, with higher FPS providing smoother video playback.EncoderOBS Studio supports several encoders. x264 (CPU-based) and NVENC (NVIDIA GPU-based) are the most popular.
Adding Scenes and Sources in OBS Studio
In this section, we’ll guide you through adding scenes and sources in OBS Studio to create a professional-looking Twitch stream. The types of scenes and sources you choose are up to you, but most streamers typically start with the following:
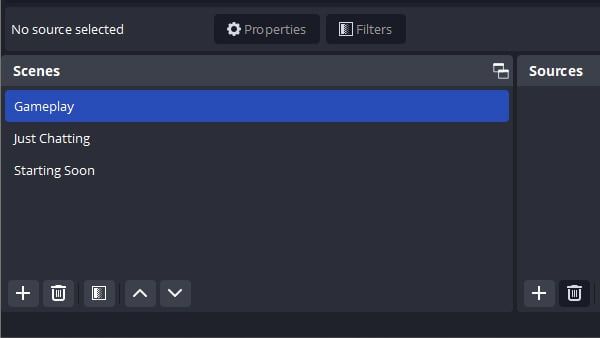
- Gameplay Scene – This is the primary scene for your stream, displaying your actual gameplay footage, webcam (if applicable), and any additional elements such as alerts, donation bars, or chat boxes.
- Just Chatting Scene – This is a great option for you if you want to engage with your audience through conversation rather than gameplay. You can set it up with your webcam, a background video, and your stream’s chat on-screen.
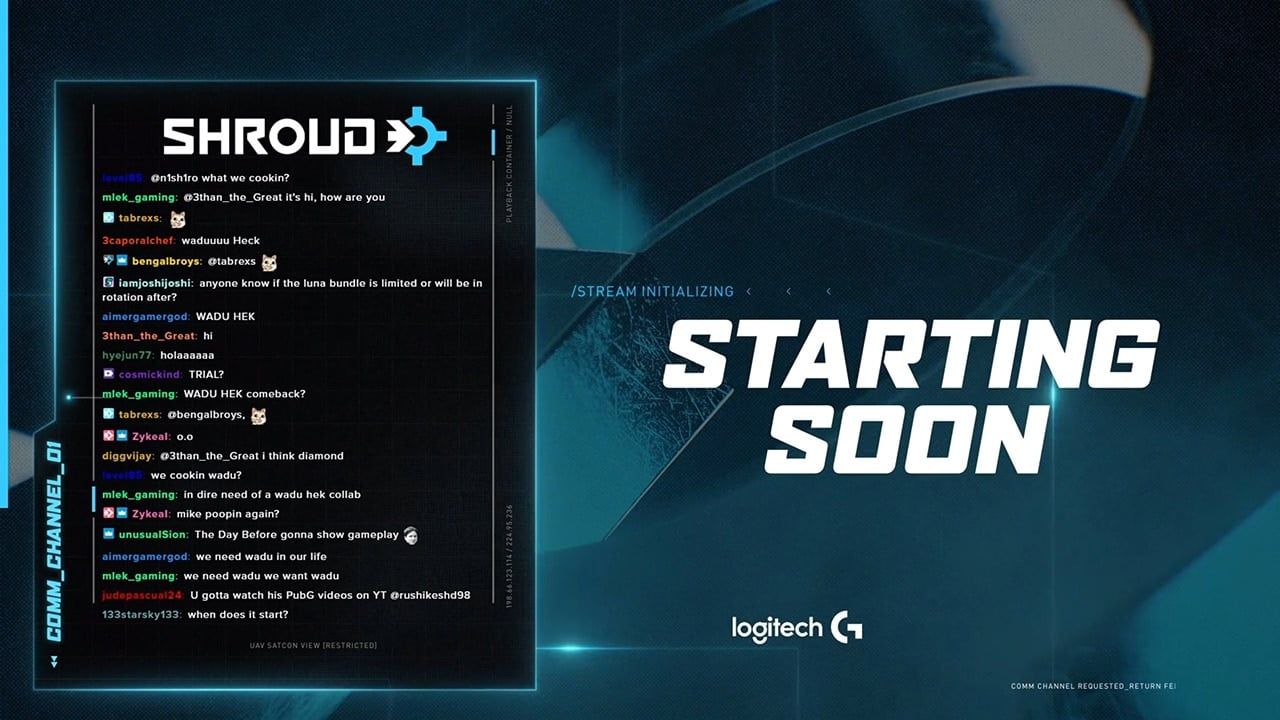
- Starting Soon Scene – Some streamers like to have a scene to use when the stream is starting to bring their audience together in anticipation. This scene typically uses a background video and countdown timer text to create excitement in chat. When done correctly, this can be a great way to have conversations happening between your viewers before you go live on your stream.
Adding a Scene in OBS Studio
Adding a new scene in OBS Studio is easy. Just follow these steps:
- Click the
+button located under theScenessection in OBS Studio. - Name the new scene appropriately and click
OK.
Repeat these steps to add any other scenes you wish to use such as the Just Chatting scene or Starting Soon scene described above.
Now, you will need to add sources to your scenes. For the Gameplay scene, these sources can include your game capture, webcam, and other elements.
The order of your sources matters as sources at the top are displayed above sources lower down, similar to how layers work in Photoshop. So, to ensure that sources are displayed correctly, it’s important to adjust the order in the Sources panel by dragging and dropping them into the desired order.
Adding a Game in OBS Studio
To add your game to OBS, first, make sure your game is running in the background. Next, follow these steps:
- In OBS Studio, select your
Gameplayscene - Click the
+button at the bottom of the Sources panel. - Select
Game Capturefrom the list of available sources. - Enter a name for the source and click
OK. - In the properties window, select
Capture Specific Windowin the Mode dropdown menu. - Choose your game’s window from the
Windowdropdown menu, and clickOK.
Your game should now be visible in the OBS preview window. Resize and position it as desired within your stream layout.

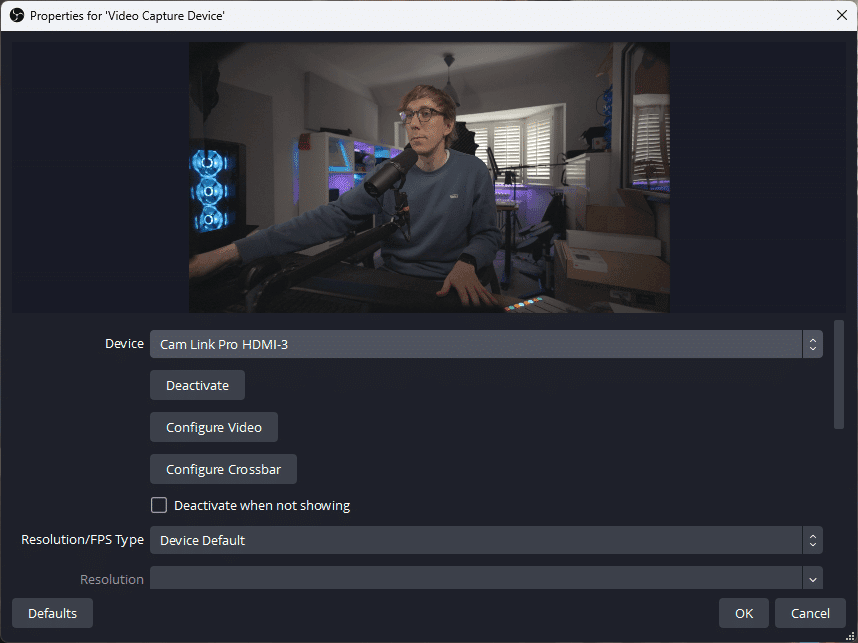
Adding a Webcam in OBS Studio
Adding your webcam to your stream in OBS is just as simple. Just follow these steps:
- Connect your webcam to your computer.
- In OBS Studio, click the
+button at the bottom of theSourcespanel. - Select
Video Capture Devicefrom the list of available sources. - Enter a name for the source and click
OK. - In the properties window, select your webcam from the
Devicedropdown menu and clickOK.
Your webcam feed should now appear in the OBS preview window. Position and resize it as desired within your stream layout. If you need to crop your webcam, you can hold down the ALT key on your keyboard while dragging the edges of the source in the preview window.
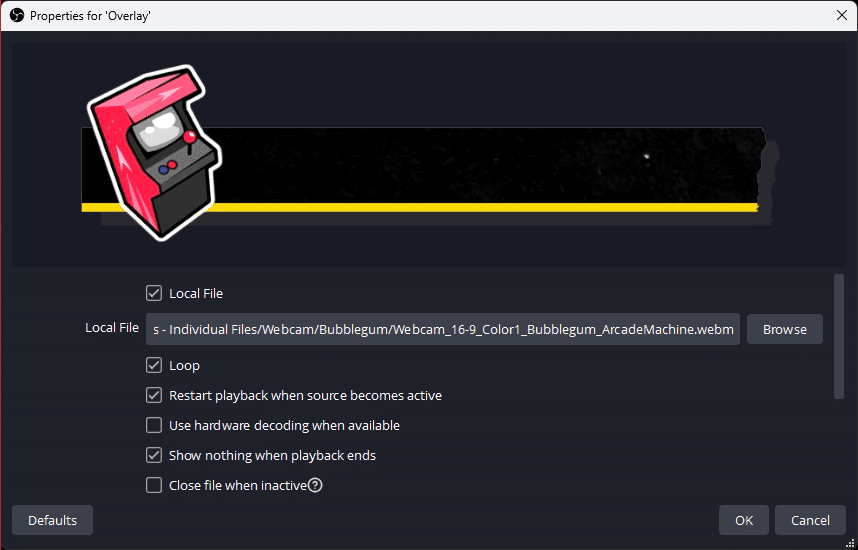
Adding an Overlay in OBS Studio
An overlay can add a professional touch to your stream. To add your overlay to OBS, follow these steps:
- In OBS Studio, click the
+button at the bottom of the Sources panel. - Choose
ImageorMedia Sourcefrom the list of available sources based on whether your overlay is a static image or an animated video. - Enter a name for the source and click
OK. - In the properties window, click
Browseand navigate to your overlay file. Select it and clickOK. - If the overlay is an animated video, you’ll probably want to enable the
Loopoption so that the video repeats.
The overlay should now appear in the OBS preview window, on top of your other sources. Position it as desired and ensure it does not obstruct important elements of your stream layout.
Adding Alerts in OBS Studio
Adding alerts for when someone follows or subscribes to your stream is a simple process. Here are the steps:
- The first step is to select an alert service. The most popular options are Streamlabs and StreamElements, and each service offers its own set of alerts and customization options.
- Once you’ve selected your alert service, you can customize your alerts to your liking. This may include choosing the type of alert (such as a follower or subscriber alert), selecting the sound and animation, and customizing the text.
- After customizing your alert, copy the alert URL provided by the alert service.
- In OBS Studio, add a new
Browser Sourceby clicking the+button under theSourcespanel. - In the
Propertieswindow for the newBrowser source, paste the alert URL from the alert service into theURLfield.
Use the preview window to adjust the size and position of the alert on your stream. Finally, test your alerts to make sure they’re working properly. You can do this by triggering a test alert from the alert service.

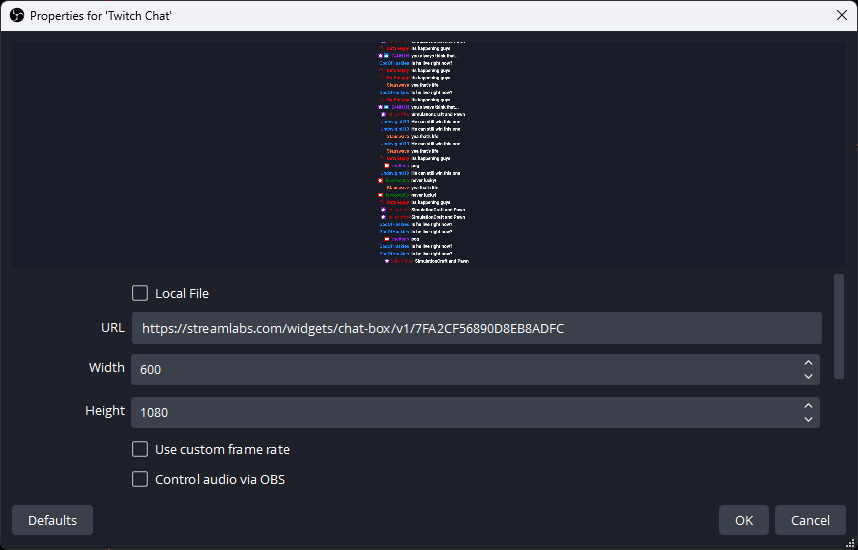
Adding Twitch Chat in OBS Studio
If you wish to add your Twitch Chat as an OBS Studio overlay, Streamlabs and StreamElements offer solutions that you can add as a Browser Source in OBS Studio.
Streamlabs:
- Go to your Streamlabs account and navigate to
Widgets. - Click
Chat Boxand customize the settings as desired. - Copy the chat box
URL.
StreamElements:
- Go to your StreamElements account and navigate to
My Overlays. - Click
Create Blank Overlay. - Name your overlay and click
Create Overlay. - Click the
+button underWidgetsand selectChat Box. - Customize the chat box settings as desired.
- Click
Save Settingsand copy the overlayURL.
Test the chat overlay by typing a message in your Twitch chat and ensuring that it appears on your stream.
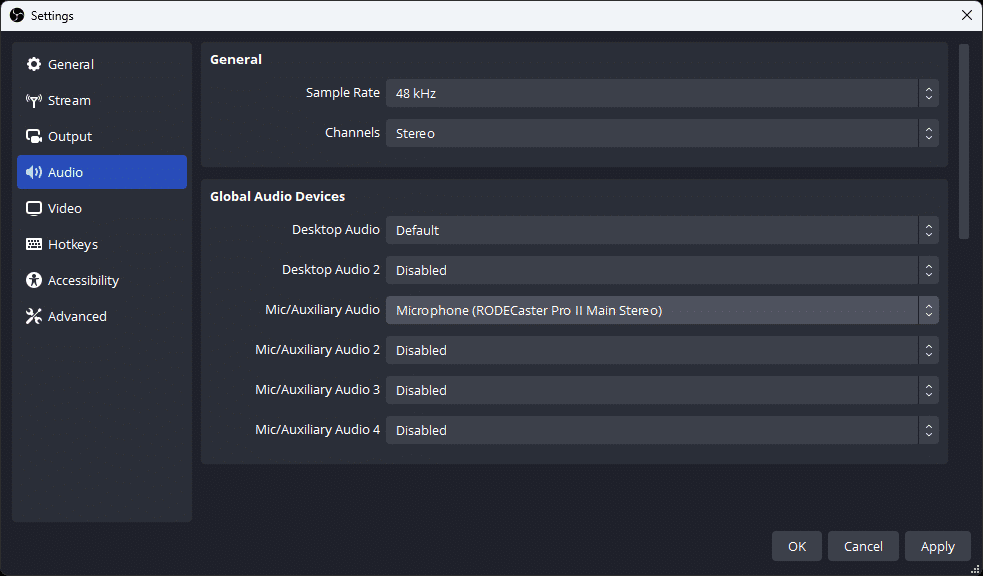
Adding a Microphone in OBS Studio
Having a visually stunning stream is great, but it’s equally important that your audience can hear you loud and clear. That’s why it’s crucial to set up your audio devices in OBS Studio, so your viewers can hear your voice, gameplay, music, and any other audio sources you want to broadcast. In the following section, we’ll walk you through the steps of setting up your audio devices in OBS Studio, so you can ensure that your audio is crystal clear and enhances the overall viewing experience for your audience.
The audio setup for your Twitch stream can vary in complexity depending on your needs. However, for most streamers who want a straightforward setup with just their microphone and desktop audio, the following steps will work:
- Connect your microphone to your computer and make sure it’s working properly.
- In OBS Studio, go to
Settingsand select theAudiotab. - Under
Global Audio Devices, select your microphone from theMic/Auxiliary Audiodropdown menu. - Select
Default, from theDesktop Audiodropdown menu. - Click
OK.
For advanced users who want extra control over their audio in their livestreams, we have a couple of advanced guides that can help take your audio setup to the next level:
- Advanced Mic Settings – Our guide on advanced mic settings will help you improve the quality of your microphone by using free audio filters such as compression, EQ, and noise reduction in OBS.
- Separating Audio Sources – Our step-by-step guide on how to separate audio sources allows you to control each audio source independently, so you can adjust the volumes of your music, Discord voice chat, or gameplay on separate audio channels in OBS.
Going Live and Streaming to Twitch
Now that you’ve completed the technical setup for your Twitch stream, all that’s left to do is hit the Start Streaming button and go live!
While there’s still much to learn to create an engaging and entertaining stream that will attract and retain viewers, you’ve now laid the foundation for success. With your setup complete, it’s time to focus on creating quality content that will keep your audience engaged and coming back for more.
If you encounter any issues with your first few streams, it might be worth reading our guide on how to fix buffering, lagging, and dropped frames in OBS. It covers the most common problems that streamers face, and the fixes required to ensure your viewers have an enjoyable experience watching your stream.