Advanced Mic Settings in OBS Studio: Tips and Tricks for Pro-Level Audio
Optimize your mic settings in OBS for professional-grade sound quality with our guide to must-have filters, EQ, compression, and more.
As a streamer, audio quality is a crucial element that can make or break your content. Good audio can enhance your viewers’ experience and make them want to stay tuned in, while bad audio can quickly turn them off and make them look elsewhere.
In OBS Studio, your microphone’s audio quality is determined by several different factors. By making some simple adjustments to your mic settings and adding a few free filters, you can achieve professional-sounding audio that will help you stand out from the crowd.
By the end of this article, you’ll be equipped with the knowledge and skills you need to take your microphone audio quality to the next level in OBS Studio. Whether you’re a newcomer to streaming, or simply looking to take your audio quality up a notch, you’ll find plenty of useful tips and tricks here to make your streams sound more professional.
Microphone Setup
The first step in improving your mic audio quality is to consider your microphone positioning. The goal is to get the best signal from your microphone with as little noise as possible.
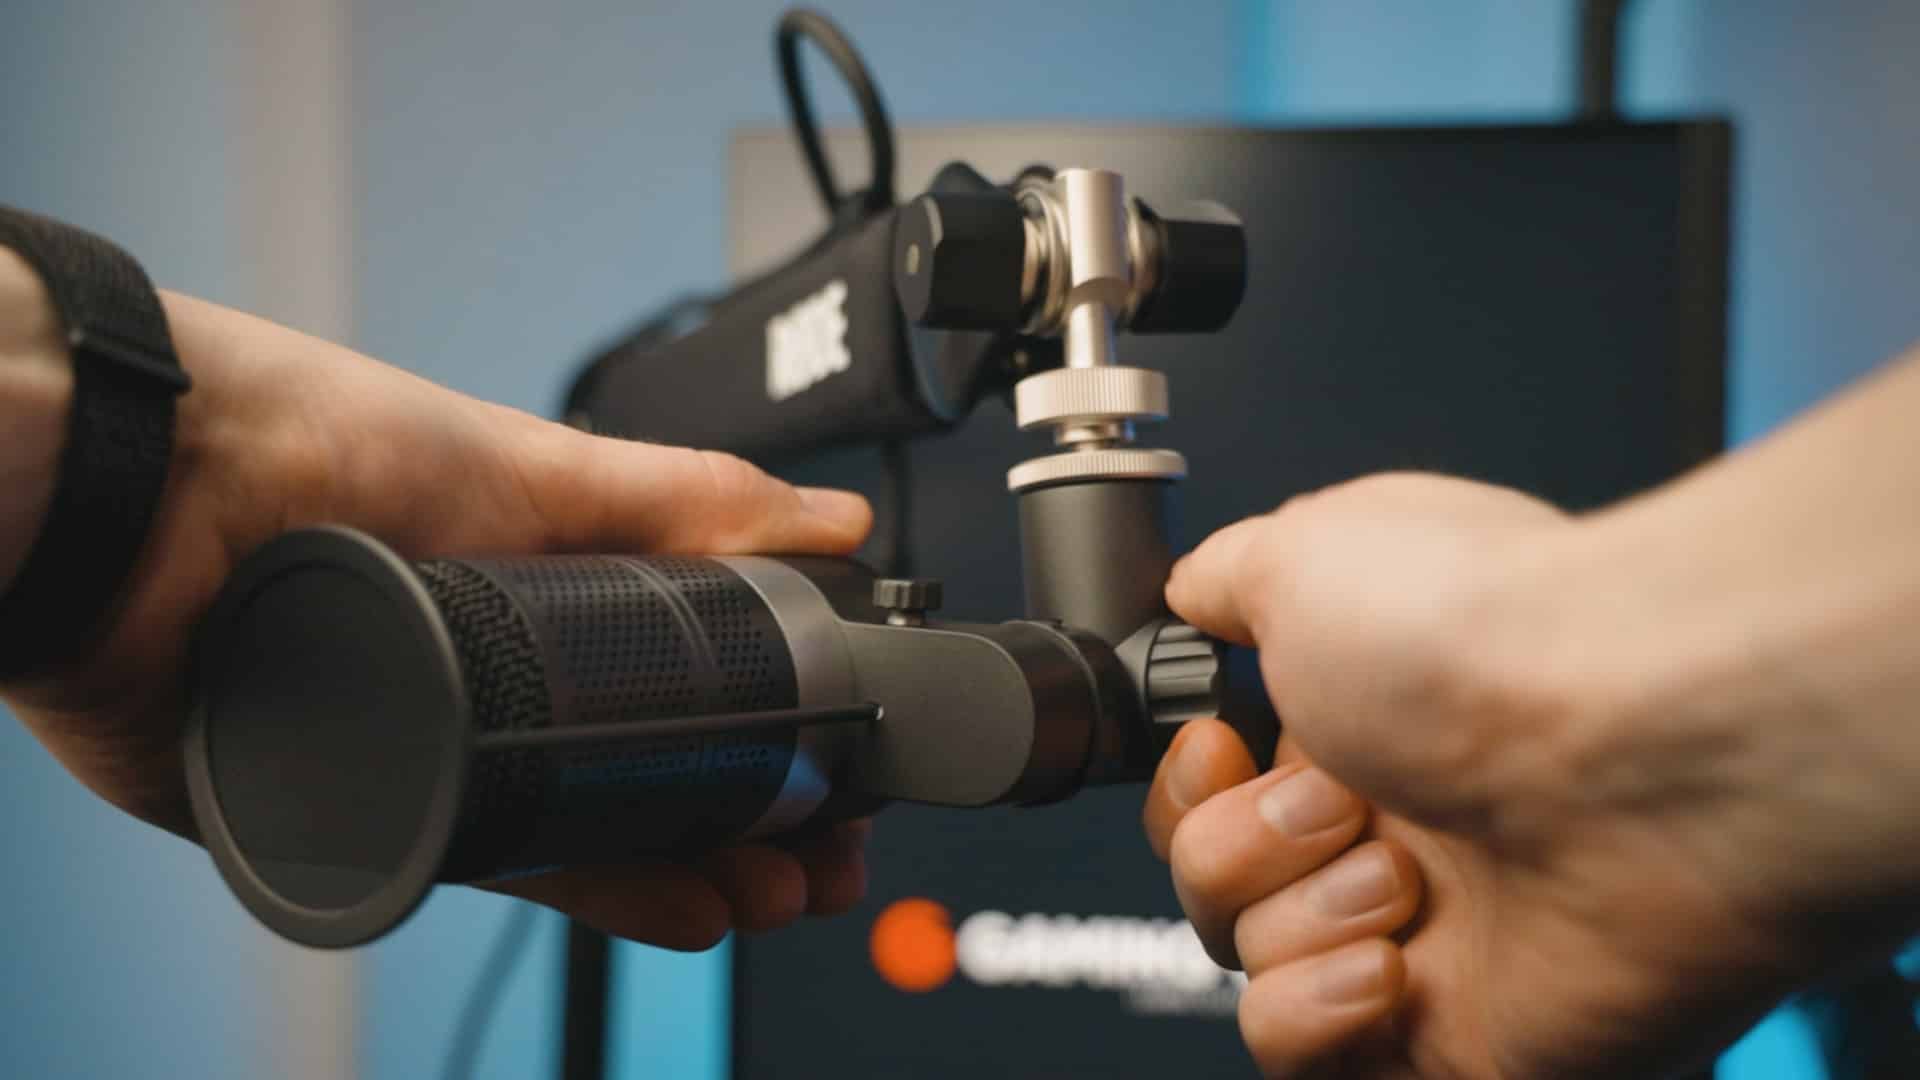
Boom Arm
Most microphones come with a built-in desk stand, but unfortunately, they usually leave the microphone too far away from your mouth and so they pick up unwanted noises from your keyboard and mouse.
A boom arm attaches to your microphone and desk and allows you to raise your microphone up and off your desk. You can then position your mic closer to your mouth and further away from those unwanted noises.
The RODE PSA-1 (opens in a new tab) and Neewer NW-35 (opens in a new tab) are two great boom arm options.
Microphone Positioning
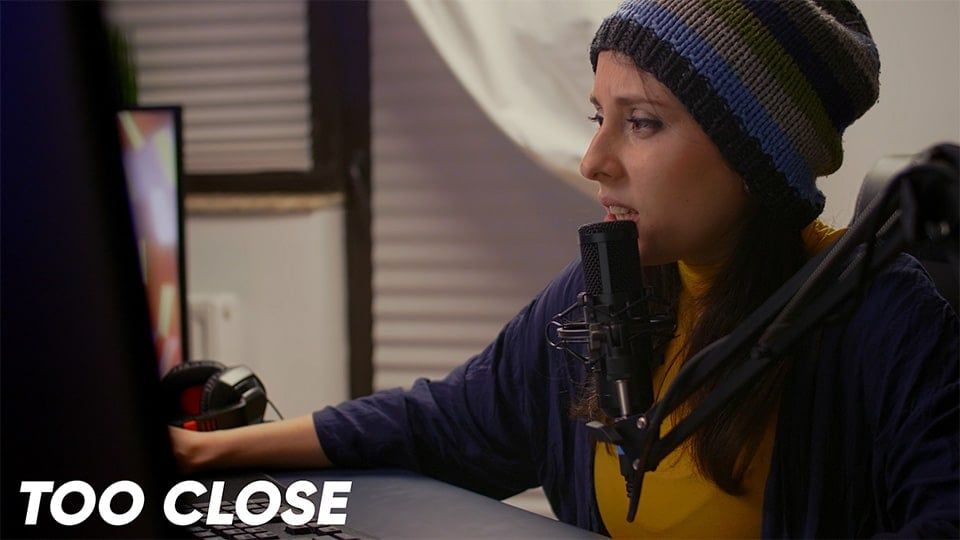
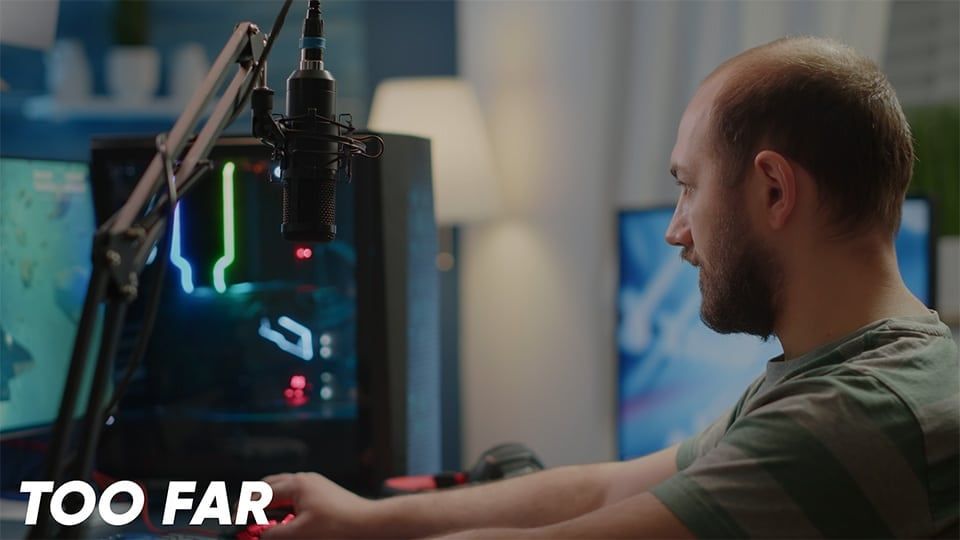
Now that your microphone is raised off your desk, you may be wondering how close it should be to your mouth. The answer depends on the microphone you’re using, but in general, you’ll want it to be around 3-6 inches away from your mouth.
A good rule of thumb is to position the microphone with 4-8 finger-widths between your mouth and the capsule. If you’re too close to the microphone, you may hear unwanted mouth noises like salivating or breathing. Conversely, if you’re too far away from the microphone, you may hear more room noise and less low-end from your voice.
To find the best position for your microphone, experiment with the distance and listen back to a recording to find the optimal placement that produces the best sound.
Microphone Technique
Another tip for microphone positioning is to have it slightly off-axis, so you’re effectively speaking past the mic. This can help reduce the unwanted plosive sounds that you may get when speaking directly into the microphone capsule.
Additionally, an off-axis position allows your audience to see your mouth instead of it being covered by the microphone. This can help create a more engaging and natural look on stream.
Pop Filter
If you’re still hearing a lot of plosives even after positioning your microphone off-axis, you may want to invest in a pop filter or foam cover for your microphone. These filters work by dispersing large sound waves before they cause distortion, resulting in a cleaner and crisper sound.
Pop filters can easily attach to most boom arms, so you don’t need to worry about any complicated installation. A pop filter or foam cover is a small but effective investment to enhance the overall quality of your microphone audio.
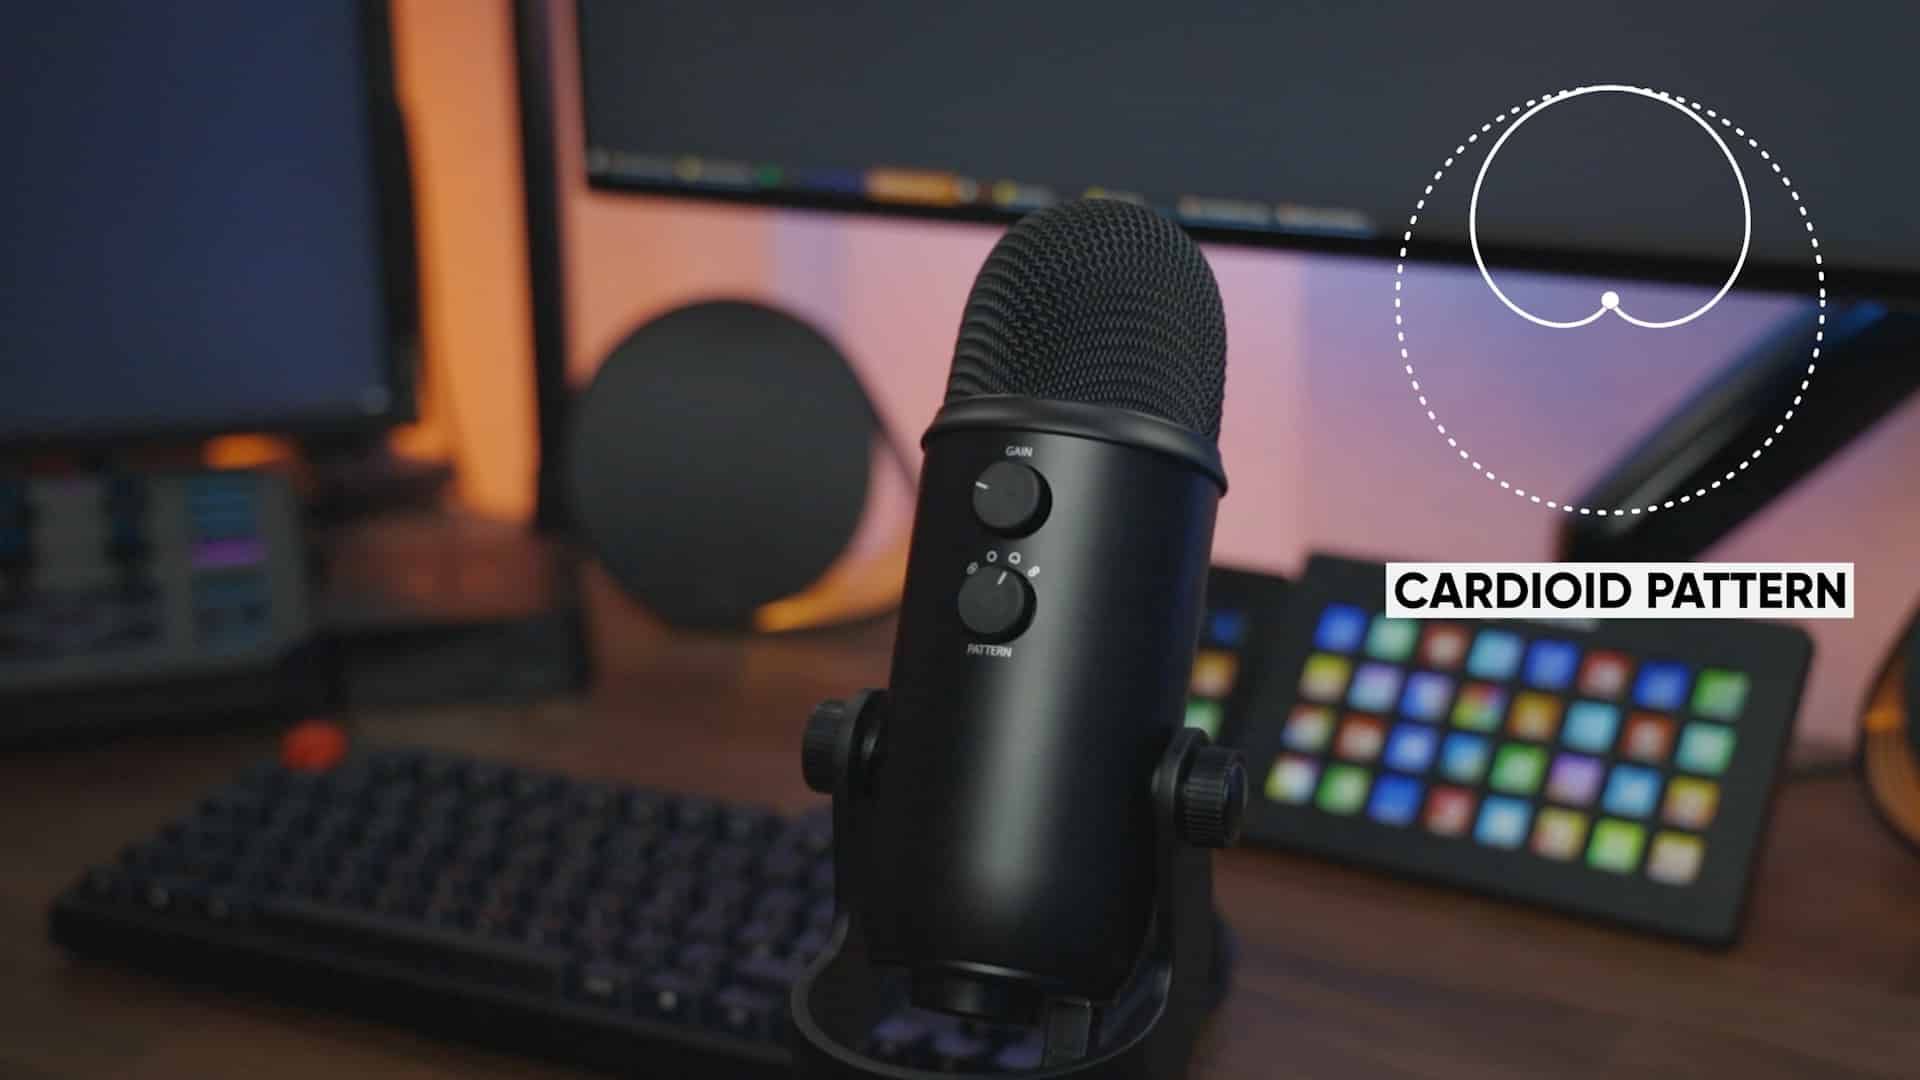
Polar Patterns
If you’re using a microphone such as the Blue Yeti (opens in a new tab) or the HyperX Quadcast (opens in a new tab) that has multiple polar patterns, it’s important to set it to the cardioid pattern. This pattern is the symbol that looks like an upside-down heart.
Also, it’s worth checking that you are talking into the front of the capsule for optimal sound quality. You’d be surprised to know that many streamers still make the mistake of talking into the top of the Blue Yeti, rather than the front.
Microphone Gain
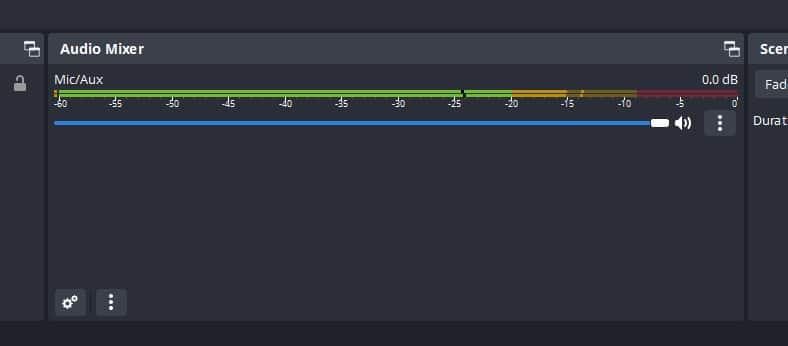
It’s important that you correctly set your microphone gain before adding any filters in OBS.
- In OBS, identify your microphone in the audio mixer and observe the meters while speaking. If you don’t see your microphone in the mixer, make sure it’s added correctly by going to
Settings → Audio → Mic/Auxiliary Audioand selecting the correct microphone. - Adjust the gain knob on your microphone until the meter reaches the yellow range of around
-15dBwhen speaking at a normal level. - Once you’ve successfully set your microphone gain, you’re now ready to apply your first filter.
Noise Gate/Expander Filter
The first filter to add to your microphone chain is a noise gate. To add an audio filter to your microphone in OBS Studio, follow these steps:
- Identify your microphone in the audio mixer
- Click the
⋮button below the meter - Select
Filters - Click the
+button and select the type of filter
What is a Noise Gate?
A noise gate is a type of audio filter used to reduce unwanted background noise. The filter works by setting a threshold level. When audio signals fall below the threshold level, the noise gate filter will cut off the audio signal, preventing any unwanted sounds from being heard.
This means that when you are speaking, the audio signal is allowed through the noise gate filter. But when you stop speaking, the noise gate should be closed, and no audio signal should pass through the filter. In essence, the noise gate filter is a gate that opens and closes to allow audio signals to pass through, depending on whether the audio signal exceeds or falls below a set threshold level.
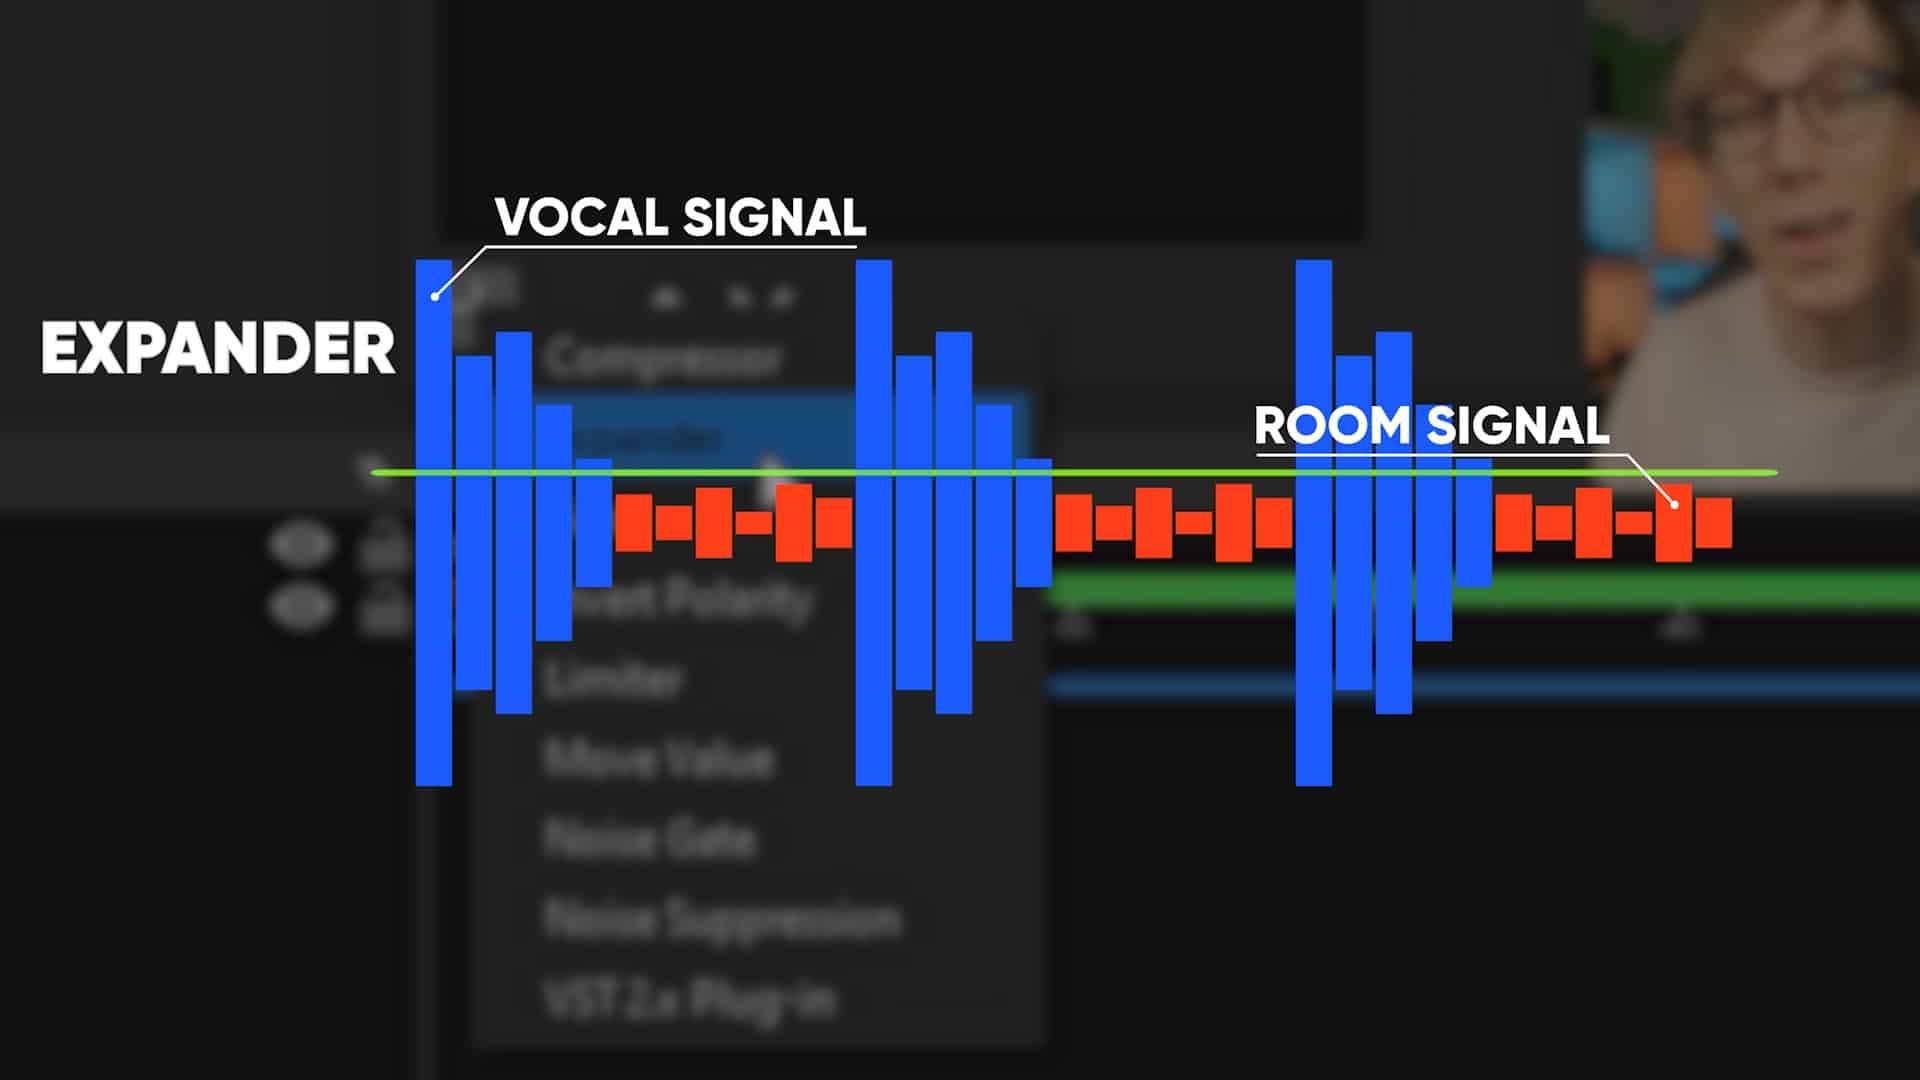
Instead of using the noise gate filter, it is recommended that you use the expander filter for a more natural sound.
What is an Expander?
An expander, similar to a noise gate, will allow you to reduce background noise when you’re not talking. But the difference is that it provides a much smoother opening and closing of the gate as there is an adjustable ratio for how much reduction you want to apply.
This effectively just makes the quiet sounds even quieter so less of your room or background noise can be heard when you’re not speaking. Overall, an expander filter is just a more natural-sounding noise gate.
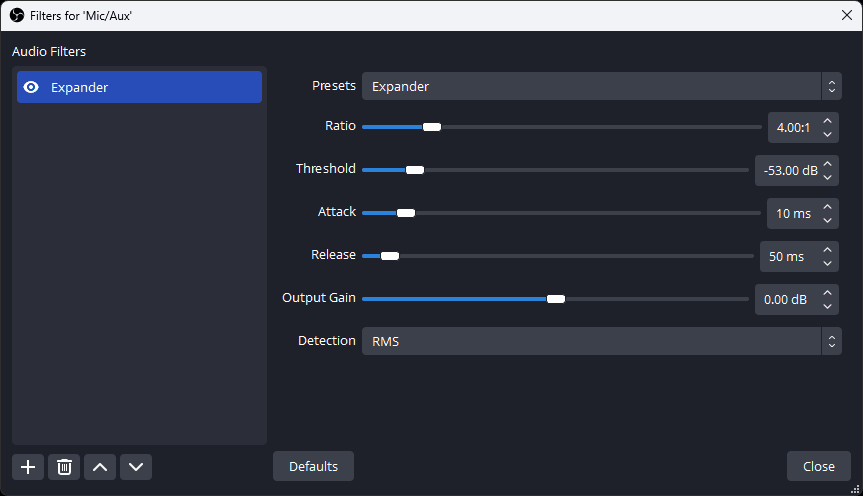
Expander Settings
Choose Expander as the audio filter in OBS Studio and configure the settings as provided below.
Ratio
This controls how much reduction is applied to the signal when it falls below the threshold. The default value is 2:1, which effectively means the signal is reduced to 50% whenever it’s below the threshold.
A more aggressive ratio of 10:1 will reduce the signal to 10% and will sound similar to a noise gate. You can adjust it to your preference, a typically recommended value is 4:1.
Threshold
This setting determines at what volume the expander kicks in to reduce the signal. Anything above this threshold in volume, won’t have the expander applied to it, and everything below will.
To set the threshold level correctly, disable the filter in OBS and observe the audio meters while being quiet. Take note of the level that your microphone picks up when you’re not speaking; this is known as the noise floor, the level of noise in your surrounding environment that your microphone picks up. Set the threshold level around 5dB above the noise floor.
Re-enable the expander filter, and check the meters to ensure it’s no longer picking up the background noise. You may need to adjust this threshold higher if some noise is still being picked up, or lower if it’s starting to cut off some of your spoken words.
Attack, Release, and Output Gain
You can leave the Attack and Release settings at their default values, and there is no need to add any Output Gain at this stage.
Equalizer (EQ) Filter
To further improve your microphone audio quality, it’s recommended to add an equalizer (EQ) filter in your microphone chain. EQ filters come in different forms and complexity levels. OBS Studio version 29.0 introduced a simple 3-band equalizer filter that you can use to make some basic adjustments.
Choose 3-Band Equalizer as the next audio filter in OBS Studio.
What is an Equalizer (EQ)?
An equalizer is a type of audio filter that can adjust the balance between different frequency ranges in your microphone audio. It allows you to change the actual sound profile of your voice through the microphone, by boosting and lowering specific frequencies and making your voice sound the way you want it to.
The 3-Band EQ filter in OBS is rather basic, with controls for boosting (or cutting) Low, Mid, or High frequencies.
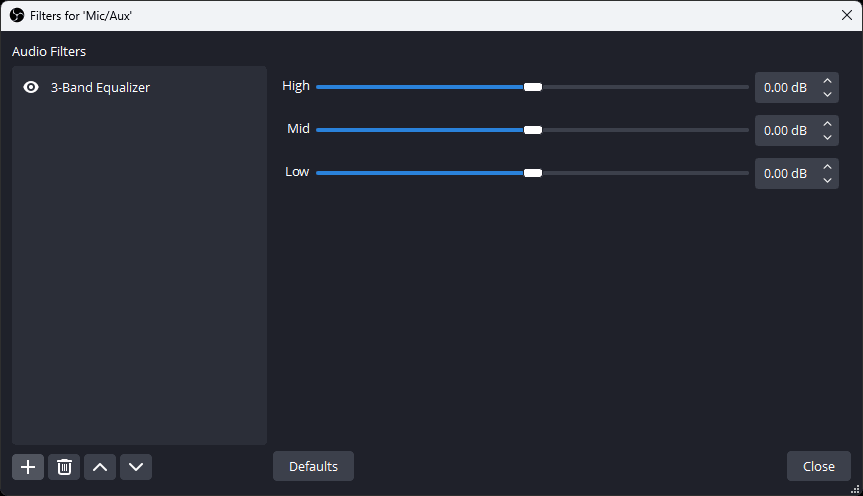
EQ Settings
Setting up EQ can be challenging as the optimal settings depend on factors such as your voice, microphone, and environment. Even if two people used the same microphone in the same environment, variations in their voices would necessitate different EQ settings.
As a general rule, it is advisable not to adjust any band by more than +/- 5dB. Most microphones have been calibrated to provide a specific sound right out of the box, and even small dB adjustments can make a huge difference.
Remember that EQ adjustment is subjective and requires experimentation to achieve the desired results. Play around with the settings, do a test recording in OBS and listen to how the sound changes, and adjust the settings until you find the optimal sound you want to achieve for your voice.
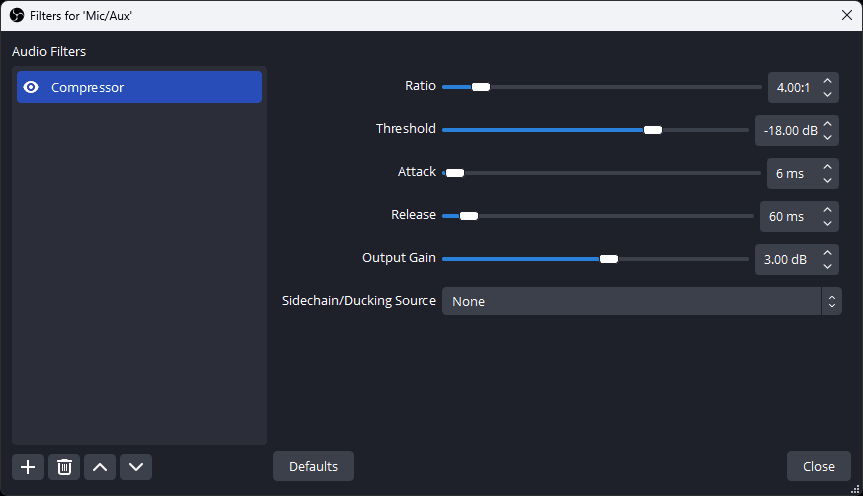
Compressor Filter
Next, you’ll want to add a Compressor filter to your microphone chain.
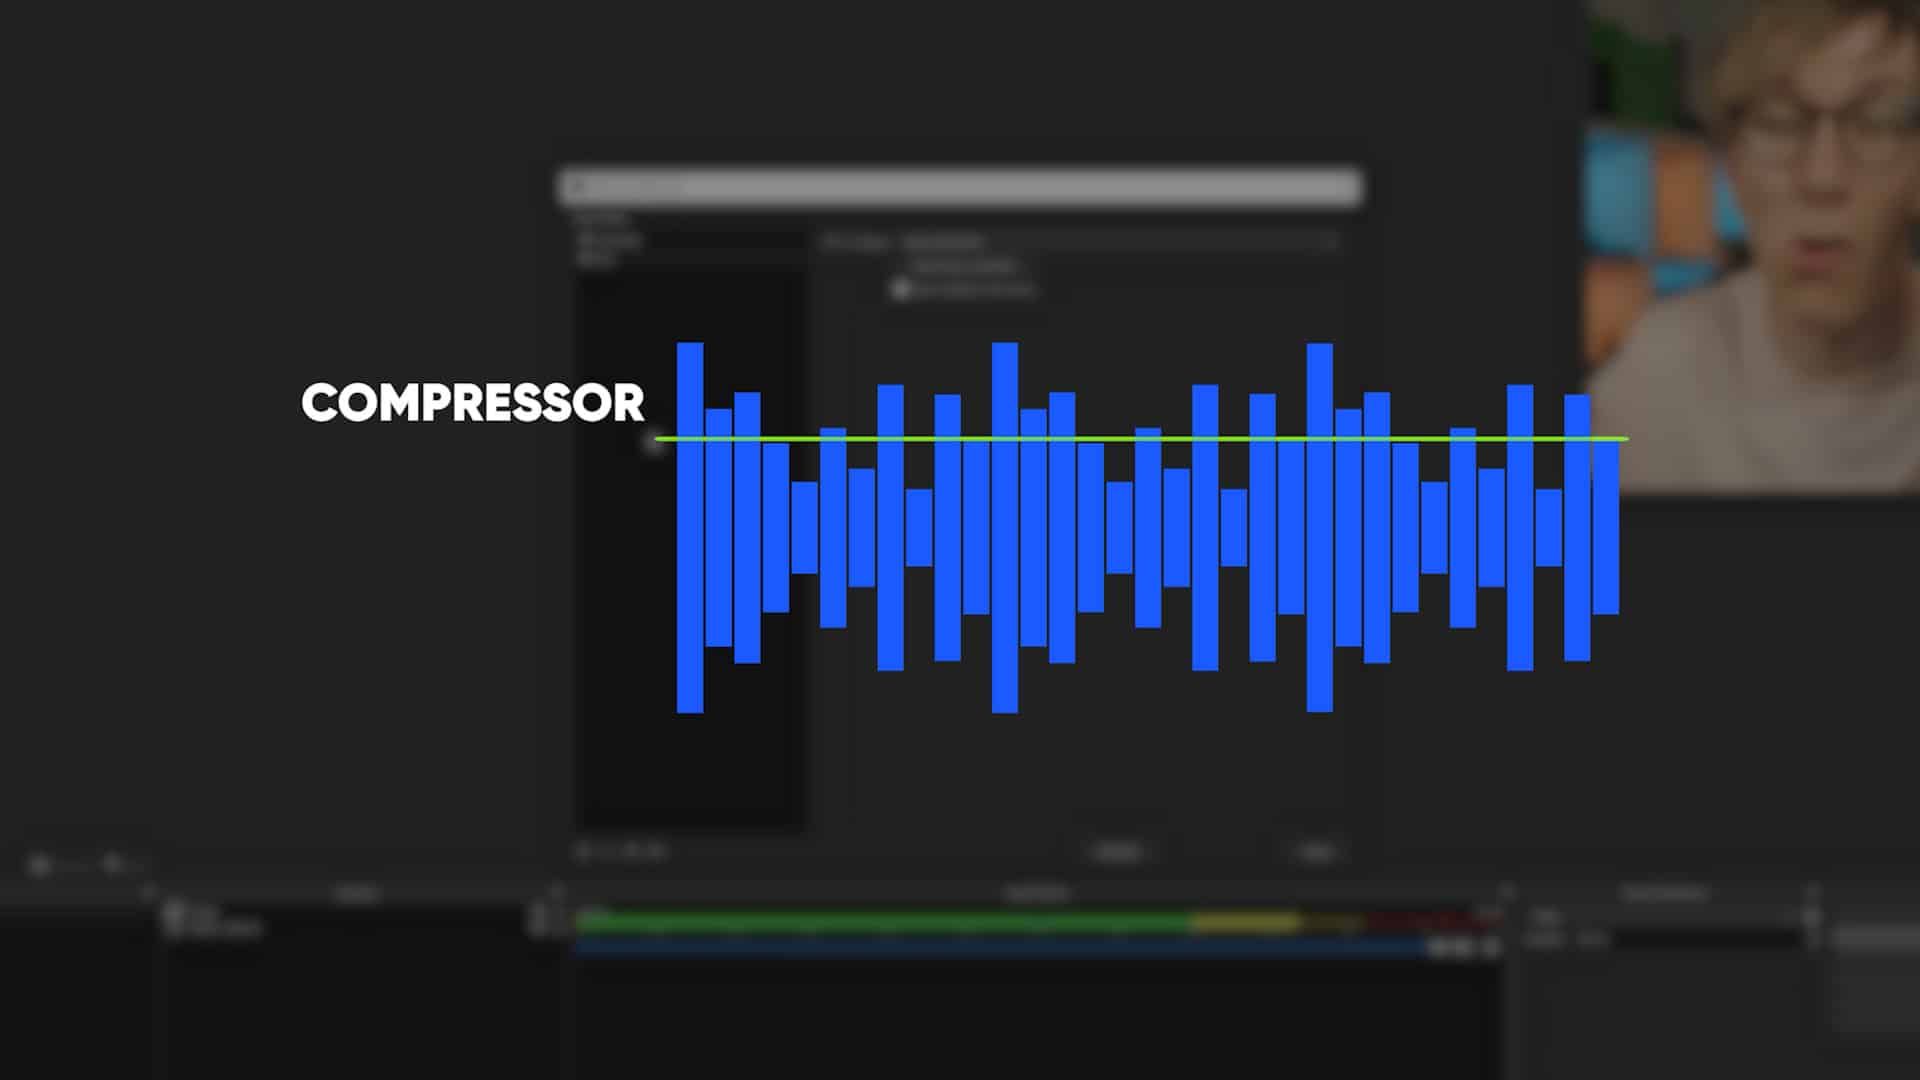
What is a Compressor?
There is a lot of misinformation about what a compressor does, but essentially, it makes the dynamic volume of your voice more consistent by reducing any louder noises. This is particularly useful in livestreaming since it can prevent any sudden volume increases when you get excited.
Compressor Settings
Choose Compressor as the next audio filter in OBS Studio and configure the settings as provided below.
Ratio
The Ratio option in the compressor filter is the same as the ratio option used in the expander filter, except that it’s used above the threshold instead of below it. It determines the amount of gain reduction that will be applied to any signal above the threshold.
A lower ratio of 2:1 produces a natural and almost unnoticeable compression, while a high ratio of 10:1 compresses the sound excessively, making it seem like your voice rarely changes volume at all. A 4:1 ratio generally strikes a good balance between natural and useful for louder moments, but it’s always a good idea to do a test recording with different ratios to determine what works best for you.
Threshold
The default value of -18dB is a good starting point. Whenever your microphone level goes above -18dB the compressor will activate and begin compressing the signal by the set ratio.
Attack, Release, and Output Gain
The Attack and Release settings can be left at their defaults, whereas for Output Gain, you’ll likely need to add a few decibels of gain. This will help bring your audio levels back to that yellow range of around -15dB. When you add a compressor filter to your microphone, it will reduce your mic levels a little bit. So, it’s important to compensate for that using output gain adjustments.
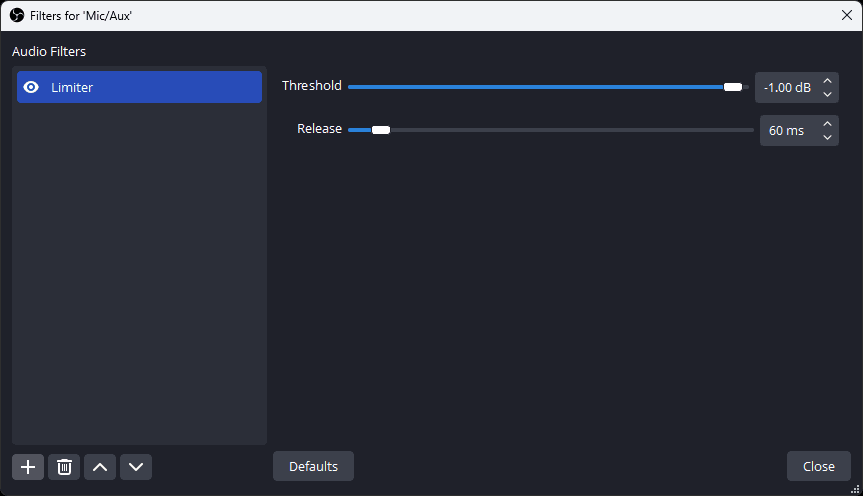
Limiter Filter
The last step in the microphone chain is to add a limiter filter.
What is a Limiter?
A limiter filter serves one primary purpose: to prevent clipping and distortion of your audio if the volume gets too high. When you speak loudly, the limiter will apply a ceiling to your audio levels, preventing any harmful distortion.
Limiter Settings
To set up the limiter, adjust the Threshold to -1dB. This ensures that your highest audio peak will not exceed this level. Leave the release setting at its default value.
Summary
Setting up a mic in OBS Studio might seem daunting, but with the right guidance, it’s possible to achieve professional-grade sound quality.
We’ve covered several essential filters to include in your microphone chain, including noise suppression, EQ, compression, and a limiter. Remember, these settings will depend on your voice, microphone, and environment, and it’s essential to experiment with different settings to find the optimal sound quality you’re looking for.
OBS Studio provides an excellent framework to achieve this level of sound quality, so don’t be afraid to dive in and start experimenting with these filters to produce great-sounding audio. With these tips in mind, you’ll be well on your way to achieving excellent sound quality in your livestreams.
Video Guide
As with all of our guides, below we have included a full video tutorial if that is your preferred method of learning.